
Welcome back! Fall is crazy busy with back to school and fall activities and such and I finally hit a point where I said I needed to regain a little sanity and time for myself, so I cleared off my painting space and looked what I had lined up the last time I had painted anything. And what did I find? Plague worms and a hero from the Descent: Trollfens expansion.
/pic1816262.jpg)
Well, I have been eyeing the plague worms for a while now and wanted something alongs of the picture to the left here. Not quite as red of a worm, but I really liked the green ones with the orange undertone. I had something a little more pink and grey for the master in mind.
I really like doing monsters like this, because you can get away with some less detailed work, while still ending up with something outstanding, if you know where you are trying to go.
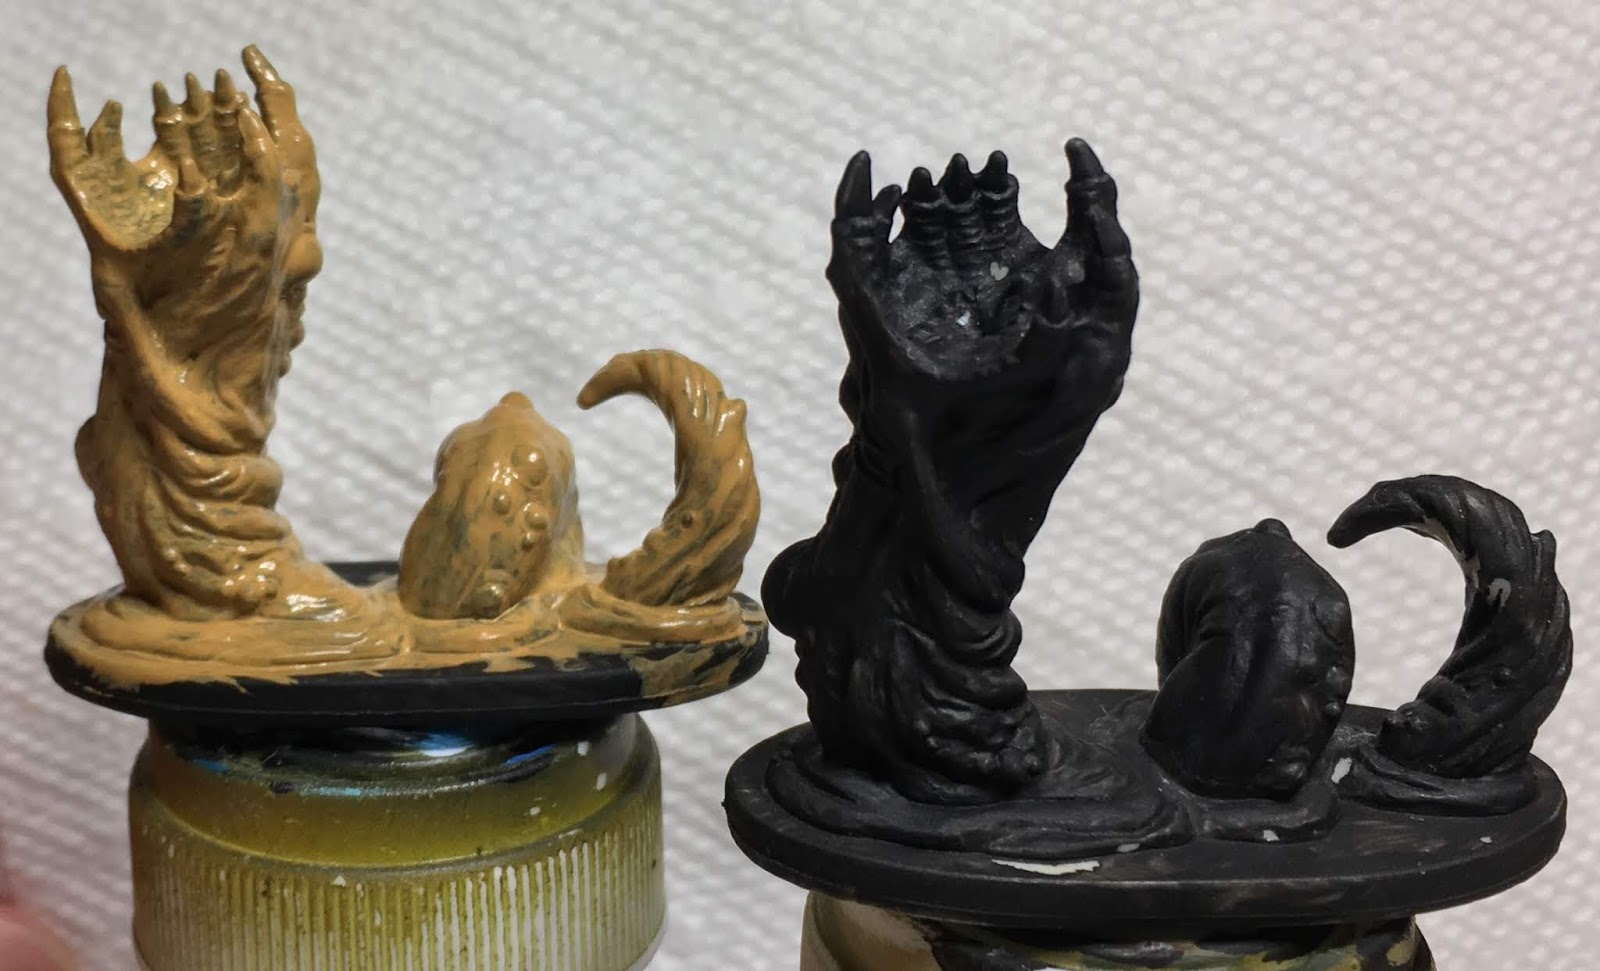
 I had already primed (in black gesso per my usual MO) the figures. For the normal worms, I wanted something of a bright orange "head" and a slightly less orange body. The green skin over the top would hide any glaring issues (I was pretty sure). I know that orange on black primer either looks like crap or take lots of coats, so I opted to basecoat with a tan. I already had a tan that I had mixed for my airbrush, but since I was only doing two models, I just brushed it on. Not perfect, but it didn't need to be for this exercise. For the master, I base coated a standard greycolor.
 Next up, I coated the bodies in Bestigor Flesh and the heads with Fire Dragon Bright Orange. This looked ok, but I wanted to take it up just a notch, which meant giving them a nice wash. For this, I use Cassandora Yellow which is very orange - too orange as it turns out, I think the age of mine is showing and it needs to be thinned down. Turned out ok though - nice bright orange like I was looking for, though it retaught me a lesson I had forgotten. When using similar hues next to each other and then a strong wash, you are going to have trouble noticing the differences.
 As you can see from the shot on the right, it just looks orange. Although it ended up being the color I wanted for the undertone, I needn't have wasted time using two shade. Oh well. For the master worm, I simply through on a black wash over the gray. I still hadn't a clue what I really wanted to do with the master except that I wanted the maw to be a pinkish color. I maybe should have just washed the grey primed worm with red, but I didn't. Oh well.
I took out the pink and painted in the maw of the master and then got a nice deep red out and set about dry brushing it. Except that I did a fantastically poor job of dry brushing and quickly realized I was using the wrong brush for the size and had far too much paint on the brush, so all I really did was rebase the mini with crimson red and pink. Change of plans I guess. See that first pic at the top? I was closing in on that. Well, ok then. I washed it again in black and decided I'd come back and dry brush it in grey with red undertones.
 Back to the regular worms. With a different brush in hand and a much better technique (ie the proper amount of paint on the brush). I managed to cover the worms in a nice green shade. Though it is hard to tell, I eventually went back with a lighter green to add some additional depth to the coloring in some areas (which I would once again waste with a wash).
Ok, quick interlude here. I spend a small amount of time on Pinterest looking at paint jobs for figures (sometimes the ones I want to paint, sometimes just at technically really great minis). Though I like to shoot for my Descent minis to have some resemblance to the art from the publisher, if I stuck strictly to that, everything would be grey and brown. Seeing what others have done inspires me to try different schemes and in some cases helps me notice details I'd normally miss. In the case of the worms, I'd NEVER have figured out and orange undercoat with a green skin. Never. Instead, these were looking really good. Not an exact replica of the original inspiration, but it is easy to see what I was basing them on.
 So now, the basics were done. What I needed was to start working the details. I spent a bunch of time looking at Warhammer models (because there are a lot of plague demons and other crap that have pustules on them). I pulled back out the Cassandora Yellow and put an appropriate size dot on each of the boils. Once that dried, I got out a bluish grey and painted in the boils. Things were looking good.
The maw was still too orange to be left alone, so I decided that I needed a brown wash to bring out the details and darken the interior a good amount. I turned to my collection of Secret Weapon Washes (which I honestly don't love because I don't like they way they flow). In my brown washes, I have a great color - Baby Poop. Knowing how the SWW flow, I ended up with exactly the result I was looking for in the maw and then got inspired to thin the wash down with water and cover the rest of the worm - I wanted to tone down the brightness of the grey-blue boils and pull everything together a little. Thinned down, it was like a light coating of dirt over the whole figure - it was great. The boils still had the right color, the orange was still orange underneath, and the green skin was a nice putrid color. Just a few details in the maw to do.
 For the master model... As I mentioned earlier, it ended up very red - actually almost purple. I dry brushed some gray, but inspired by this dragon model (if you are a painter, read this article, it is pretty interesting) and the artist's description of using purple and greens to create the different grays, I also dry brushed a light bit of green over the gray and finally felt like it was getting where I wanted it to be. The purplish undertone with gray-green looked pretty good (though I had really at this point lost the pink color I was trying for in the maw at the start).
I decided to go with green for the boils and liked the look enough of the green droplets that I decided to just use a little yellow on top rather than a different color as I had done with the boils on the regular worms.
Getting all that done on the models just left a couple of details to finish. Each worm's body parts are coming out of a "base" so I painted each of the rock bases and did a heavy wash on them. Each of the maws have a number of teeth that needed to be done (not just the ones on the edges, but also inside the maw. A surprising number of painted models I saw completely ignored the inner teeth - a simple detail that shouldn't be overlooked - a small number of small brush strokes added a lot to the detail of the model.
 As I was finishing up the bases, I decided I wanted some of that pink back on the master, so I went and grabbed a bottle of pink and dry brushed the slightest amount around the maw.
So, while it has been a while since I painted, these worms were a good way to get back into the swing of things. I like monsters models like this - they allow for some playing with various techniques that I don't normally get to try and all the imperfections are not obvious at first glance (and of course, this kind of monster has no face to worry about). I don't know if this means there will be a steady stream of new stuff, but I do tend to get more painting done in the fall/winter, so we shall see.

Be sure to check us out at PunchBoard Media!


I took out the pink and painted in the maw of the master and then got a nice deep red out and set about dry brushing it. Except that I did a fantastically poor job of dry brushing and quickly realized I was using the wrong brush for the size and had far too much paint on the brush, so all I really did was rebase the mini with crimson red and pink. Change of plans I guess. See that first pic at the top? I was closing in on that. Well, ok then. I washed it again in black and decided I'd come back and dry brush it in grey with red undertones.

Ok, quick interlude here. I spend a small amount of time on Pinterest looking at paint jobs for figures (sometimes the ones I want to paint, sometimes just at technically really great minis). Though I like to shoot for my Descent minis to have some resemblance to the art from the publisher, if I stuck strictly to that, everything would be grey and brown. Seeing what others have done inspires me to try different schemes and in some cases helps me notice details I'd normally miss. In the case of the worms, I'd NEVER have figured out and orange undercoat with a green skin. Never. Instead, these were looking really good. Not an exact replica of the original inspiration, but it is easy to see what I was basing them on.

The maw was still too orange to be left alone, so I decided that I needed a brown wash to bring out the details and darken the interior a good amount. I turned to my collection of Secret Weapon Washes (which I honestly don't love because I don't like they way they flow). In my brown washes, I have a great color - Baby Poop. Knowing how the SWW flow, I ended up with exactly the result I was looking for in the maw and then got inspired to thin the wash down with water and cover the rest of the worm - I wanted to tone down the brightness of the grey-blue boils and pull everything together a little. Thinned down, it was like a light coating of dirt over the whole figure - it was great. The boils still had the right color, the orange was still orange underneath, and the green skin was a nice putrid color. Just a few details in the maw to do.

I decided to go with green for the boils and liked the look enough of the green droplets that I decided to just use a little yellow on top rather than a different color as I had done with the boils on the regular worms.
Getting all that done on the models just left a couple of details to finish. Each worm's body parts are coming out of a "base" so I painted each of the rock bases and did a heavy wash on them. Each of the maws have a number of teeth that needed to be done (not just the ones on the edges, but also inside the maw. A surprising number of painted models I saw completely ignored the inner teeth - a simple detail that shouldn't be overlooked - a small number of small brush strokes added a lot to the detail of the model.

So, while it has been a while since I painted, these worms were a good way to get back into the swing of things. I like monsters models like this - they allow for some playing with various techniques that I don't normally get to try and all the imperfections are not obvious at first glance (and of course, this kind of monster has no face to worry about). I don't know if this means there will be a steady stream of new stuff, but I do tend to get more painting done in the fall/winter, so we shall see.

Be sure to check us out at PunchBoard Media!
No comments:
Post a Comment