The Punchboard Media Group has a "
Big List of Games" that talks about games that we love and feel that others should play for one reason or another.
Viticulture is one of the games that I nominated. As worker placement games go, it is one of my favorites and I really enjoy both the theme of the game and the huge number of ways that you can score points to win. I love that I can do something for a little bit and switch gears based on opportunities (or if I'm denied an opportunity). I like that I've enjoyed the game with differing numbers of players, as it seems to play well with just two players as well as four or more.
As an expansion of what I wrote for our Big List feature, I wanted to express what I enjoy about this game and present a review of Viticulture and its expansion Tuscany. And before I do that, I want to give thanks and a big shout out to all the folks that have taken time to post pictures of this game in one place or another - most of the pictures I use for on this blog have been previously posted by others. If you have ever found a picture that I've used and would prefer I remove it, I am more than happy to do so as I do not wish to upset anyone in any way.
/pic2619743.jpg)
In October of 2012, a fledgling game company out of St. Louis ran a Kickstarter for a game about making wine. Now, I like wine and games and this game sounded ok, so solely based on just that, I kickstarted the game. The game funded and was delivered in May 2013 with a single expansion called Arboriculture. This game was of course Viticulture, a worker placement game about running a wine business (not making wine per se). I was even fortunate enough to have the designer of the game teach it to me at The Geekway to the West a week or two before receiving my copy.
In April of 2014, a new and related project was funded on Kickstarter -
Tuscany: Expand the World of Viticulture. Tuscany was to be a set of mini-expansions that could be played semi-legacy style (you didn't change the world, but you could slowly introduce the expansions in a semi-logical ordering). This was also the point at which you could order both the game and the expansion packed together in a large sleeve (that looked like a wooden crate) as the Collector's Edition. Generally speaking, when I speak of "Viticulture" I really mean Viticulture and Tuscany together, and not any of the "Essential Editions" that came out later with a subset of the expansions that I'll be discussing below.
First let me talk about the original base game - Viticulture (or as I've come to call it, "Vanilla Viticulture"). The vanilla version of the game is your basic worker placement game with a theme of running a wine business - you plant vines, harvest grapes, make wine, aged the wine, and sold it. Along the way, you'd build up the infrastructure of your winery so that you could give tours, receive visitors, and make a little cash to hire more workers, etc.
Players all start with the same resources and a start player is randomly determined. Players start each round of the game by picking that round's turn order. Choosing to go later in the order offered the players increasingly better "bonus" items for picking a spot. Each of the various actions that are available to be used by all player's workers during a year are limited, so not everyone will get to do everything they wanted to do in a given game round, thus turn order is fairly important.
Unfortunately, I feel that the vanilla game is flawed. Players are all trying to do very similar things in the early part of the game: get an additional worker (extra actions are important in worker placement games), plant vines (you can't get grapes if you don't plant), harvest grapes (you can't make wine without grapes), make wine (you can't fulfill orders and score without wine). The route to some of these things might vary slightly (you might need to first build a trellis to support a certain type of vine before you can plant that type) but really, players were essentially trying to do A+B+C or maybe A+B+D. Early turn order (which was picked by randomly choosing a start player) had a huge effect on the game. In a game with 3+ players, you can end up going last multiple turns in a row and immediately being behind the other players (engine-wise).
On top of that, you are coupled that with the dreaded "luck of the draw". You see, there are a lot of cards in the game: vines, visitors (two decks) and orders cards. Players can get frustrated by any number of bad draws (only drawing one color of grape vines (red or white) when you have orders for the other color), only getting orders for expensive late game wines like sparkling or high value wines, and/or drawing visitor cards that don not help an early game player. These are some of the slightly frustrating things that I found made this fun game a bit flawed. Don't get me wrong, a hyper-competitive game is ok, but when you stack that on random chance, you can immediately be in a position of trying to catch up the whole game through no fault of your own. Otherwise, Vanilla Viticulture was a competent enough game with a good blend of mechanics that tied logically enough to the theme.
Based on what I just wrote, it is hard to believe I
love this game. Again, what you have to understand is - I don't love Vanilla Viticulture - I do love the Collector's version (or maybe I love Tuscany). Tuscany is a masterpiece of changes that turn an ok game into a more varied and complete game that offers players an almost overwhelming number of ways to score points and an asymmetric starting position that doesn't force everyone to do the same thing. It also introduced the Grande Worker, which gives everyone a "once per round I'm going to get to do at least one thing I want"-worker. It isn't all perfect and there is a lot of stuff in Tuscany, but I'm going to walk through each of the modules and let you know what I think - not just a description of the module, but what I think they each add (or don't) to the game.
Before I do that, I want to address the folks that hate games where they have to get an expansion to "fix" the game. I get that, and so did the designer of the game. Thus the "
Essential Editions" came to pass. If you just buy the Essential Edition of Viticulture, you are getting a fine worker placement game with a lot of the rough edges sanded off. But if you want a deeper, more varied game, then you also need Tuscany in all its glory.
And here is what Tuscany is all about.
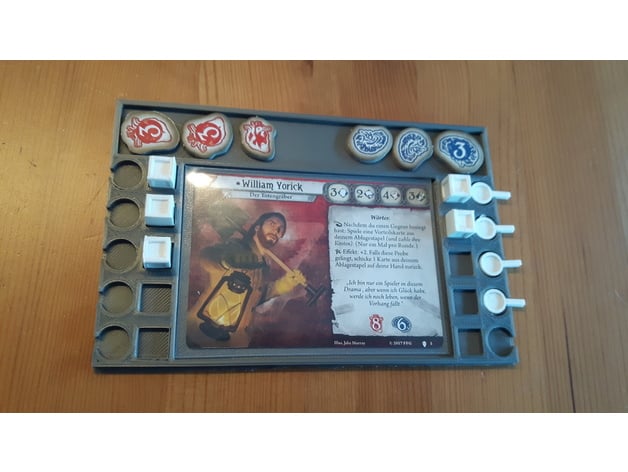
Grande Worker - this isn't so much an expansion as it is a staple and fundamental change to the game that is now part of the base game (essential edition). As I just described above, this basically lets you place your worker on any action (regardless of availability for a worker on the action). You may not get a bonus, but you don't get hosed out of something you really really need to do.
Mamas and Papas - no, not the group from the 60s, but another essential expansion. Yes, this expansion is also one that has been included in the Viticulture Essential edition. What this simple module does is vary the starting resources for each player. Each player gets a momma card and a papa card. One card gives you a couple of items and the other gives you an item and the option to take a bonus OR some cash. This changes the start of the game dramatically as nobody starts with the same needs for the early rounds of the game. Nobody should play Viticulture without using this module.
Properties (I believe the name has been changed to fields in the newer editions) - the purpose of this module was to solve the early game cash flow issue. Early in the game, money is not only hard to acquire, it is hard to acquire in quantities that make a difference. This module solves that by offering you the action to sell parcels of your land. The land has to be empty and once sold you cannot use the parcel unless you buy it back. It costs you actions and a potential plot of land for growing grapes, but the ability to trade off some land for cash to buy a structure or worker is more important in the early game and this module dramatically speeds up the early portion of the game. We always play with this expansion and it works exactly as it is supposed to.
Patronage - Each player gets a card that is two parts. Part 1 - sell any one wine token of value 5 or more and get 3 pts (you have to take a "fulfill an order" action to do so). The other portion is a unique goal for each player that can score you 2 additional points at the end of the game. You must do the first part to be eligible for the second. I am not a huge fan of this particular expansion for the following reason. The 2pt end-goal is strategic and I don't find Viticulture to be a strategic game, I find it more tactical, so by specifically adding 2pts to one specific goal, it makes your play more limiting (or, it rewards someone that happens to be tactically in a position to fulfill the result - ie. if you are lucky, the goal matches what has been available to you). And yeah, there is some luck. Anyone that has played Viticulture knows that this game has an "end game rush" - when one player edges up far enough to the end game trigger, it is very likely that the game will end within a turn. That last turn ends up being a mad scramble to get as many points as you can. The goal on this card (being only 2 points) typically isn't a focus in the scramble, but you may end up with the points out of pure luck as everyone else sells everything they have to score some points.
The other issue I have with this module is that it forces a player to get a medium cellar (needed to get wine of the right value) and make at least one wine of enough value to activate the card. I've played games where I've been able to effectively ignore making wine by scooping up a lot of points in all the actions other players are ignoring as they focus on wine. I don't think this unbalances the game, but it does "encourage" all the players down that one main path - which was a main complaint I had about Vanilla Viticulture, so we typically skip adding this module.
Advanced Visitors and New Visistors - I'm lumping these card expansions all together. We use ALL the visitor cards all the time. The additional cards level out the unevenness of the cards from the original game and make it more likely that any given card draw isn't a dud. You can still get cards that don't help you of course, but the likelyhood is lower with a better mix. Additionally, there are so many ways to get cards with the other expansions in the mix, it is simply easier to just shuffle everything together rather than worrying about trying to pull something out or only use one set or another.
Extended Board - this is something of a major overhaul to the game and a
really good one. A whole new board replaces the original. A good portion of it is familiar, but there are a lot of little changes that really expanded the game. For familiar actions, some of the bonuses have changed or moved (thus, depending on the number of players, bonuses may or may not be present or might be different than the original board). I have found all of these changes are great and when you are getting blocked on certain actions, there always seems to be something productive you can do instead. This all sounds like a lot of changes, but I don't think that teaching a new player the game with this board is unreasonable by any means and I think this board really opens up the game for the better.
*
Four Seasons: the game board is now divided into four different seasons of actions. These groupings make the flow of the game more interesting by breaking up the action groupings into similar items and makes the changes in the wake-up chart work really well.
*
Different wake-up chart: this change goes hand in hand with the different seasons. At the start of the game, a random players picks wakeup position (as before). After that, the person that first runs out of workers/actions at the end of year picks up all their workers (making those spots available) and then gets to pick their wakeup position for the next year (if you take the last position, you are required to take position #1 the following year). This change makes a big difference in your planning and for players with less workers than their opponents, it give you an opportunity to aggressively plan for the next year. Having less actions (or less actions during the important scoring action during the last season) means getting to make an election for turn order before other players. Additionally, there are seasonal bonuses for your position (ie after each season you get a specific type of card or bonus rather than a single bonus for that wake-up slot). The new wake-up chart is far more interesting as the seasonal bonuses makes choosing your turn order much more interesting of a choice.
*
The grey card - this new icon appears in a couple different places and just means that players have their choice in selecting a card or cards (ie you can pick any color card when you see a grey card).
*
Influence Map - there is now an action on the board that lets you place influence (each player gets a number of influence/star tokens) onto a mini map of Italy. Each region on the mini-map gives the player a bonus (some coins, a card, etc) immediately and then at the end of the game the player that has the most influence in each area scores points. Yep, they added an area control mini-game to Viticulture/Tuscany.
*
Trade Action - this new space replaces the sell grapes action with an action that lets players trade 2 cards, 3 coins, 1 VP, or 1 grape for any of those items. Have 2 worthless cards? Trade them for new ones. Need 3 coins and don't need that silly 1 grape sitting there aging? This action helps to open the game up some more (and in the case of cards, is another way to mitigate bad draws).
*
Sell Wine Action - there is now a space that simply lets you sell a single wine token for points. You can get more points for blush and sparkling than red and white of course. This action space helps out players that can produce certain types of wine, but just can't seem to get the right order cards (or keep missing out on the action to fulfill orders).
*
Victory Point track change - the game end is now 25 (instead of 20) points and the track goes beyond that. With the plethora of new point scoring options, you won't notice games being any longer.
Honestly, the influence portion of the map might be the most dramatic change, with the way that you choose turn order the second biggest change. If you are teaching the game to a new player, using this board shouldn't make learning the game any harder as the new player wouldn't be unlearning anything and the different option aren't hard to understand, they are just different than the original game. Yes, there are lots of little choices/things to do, but that is mostly true in any worker placement game. I really enjoy the new board and don't see us ever going back to playing without it.
Special Workers - ok, this is another module that has a lot of moving parts, but I think is very worthwhile to use. Don't let the variety of special workers overwhelm you - they add a little extra variety to each game, but not an overwhelming amount. When you play with the specialized workers you only select
two (at random) to make available to players. They cost an additional Lira (regardless of how you acquire the worker) to acquire. Players still have a cap at 6 total workers, so you aren't going to flood the game with actions. The special workers can be used as a normal worker if you can't use their special power. Here is a quick description of the various workers and my thoughts:
*
Farmer - when you place the farmer on an action, you can gain any of the bonuses for that action - regardless of player count and whether the farmer was placed on a bonus space. This is a nice worker that can speed things along in the game (the faster you get stuff or actions, the faster the game goes).
*
Mafioso - when placed on a non-bonus action space, you can take the action twice (within the rules - so you can't harvest the same field twice in a year). This can be useful for a few of the actions (like giving a tour, trading, making wine, or fullfilling orders). Not a bad option, but not as useful as some others.
*
Chef - the chef can bump any other non-chef worker off a spot (and back to that player) to take an action. This worker also speeds that game along by allowing multipler players (or even the same player) the ability to take an action on top of what the Grande worker gives you. Returning a worker means players will get more actions, which in turn can mean a bit faster game play.
*
Innkeeper - when you place the Innkeeper, you can pay 1 Lira to another player on the same action space to steal a random card from that player (not applicable in a 2-player game). I mostly play 2-player games, so we haven't used this worker, but I don't know that this is an overly useful change up to the game except to increase conflict.
*
Professore - when you place the professore, you can retrieve a previously placed normal worker, from that same season, back to your available pool. This worker is really great for speeding the game along as it frees up a used space (making any possible bonus available again) and effectively increases your worker pool.
*
Soldato - when the Soldato is on an action, other players must pay you 1 Lira to use that same action. On the flip side, another player can use that action (if they pay) even if there are no available spaces. This worker can help speed the game up by allowing players to use an action that doesn't have available slots. It is likely that the money is only an issue in the early game, so reasonably, this shouldn't be slowing players down much. Not as interesting as some other special workers, but can speed the game up by making actions available that wouldn't be there otherwise.
*
Politico - when you place the politico, you may pay 1 Lira to gain the bonus on that space again. This one is really a fairly limited use kind of worker and while it has a couple of interesting placements, overall is one of the least interesting of the bunch.
*
Oracle - When you place this worker and draw cards, you can draw an extra card of the same type and discard one of the ones you drew. Effectively, this is a card draw luck reducer. I find with all the other options that are available on the Tuscany expansion game board that this worker is one of the least interesting of the group. It doesn't hurt to take them, but a lot of the other workers are more interesting to play with.
*
Merchant - If you place the merchant after all the other players have passed in a season, you can draw a card of any type. Pretty limited appeal and use. In a two player game, we have a lot more opportunities for this worker's use, but overall it is not all that interesting unless you are going for a visitor heavy strategy.
*
Traveller - You may place the traveler on any open space in a previous season (regardless of availability of the actions spaces) and immediately take the action. This is a fantastic worker that can help open up the game. Well worth getting and playing with.
*
Messenger - a little like the inverse of the traveller. With the messenger, you can place the worker in an action in a future season. When you get to that season, your first action is to take the messenger's action. This lets you "reserve" a spot you need down the road and helps to solidify what you can do. Another worthwhile special worker.
Overall, I like the special workers. They add a little variety to the game and generally speed the game up. Some are less interesting than others, but the little extra ability adds another nice consideration to the tactical gameplay.
Structures - this expansion module is a new deck of cards that are special structures that players can build. Each player can have up to two structures built and there is a money cost like other structures. All the special structures give players a point when built. Some of these provide a new actions, some provide an ongoing bonus, and the third kind provide a residual of some sort (not money) at the end of each year. These are great additional options for the players as new ways to approach the game. We don't always build them, but we always play with the structures deck so we have the option. Even the structures that seem unbalanced have not ended up being so in our plays - for example, one structure let a player acquire a worker for free (plus they got a coin) AND that worker could be used the same year. It sounds really overpowered, except for the 6 worker limit AND I simply had to adjust and build out my worker force immediately. The building cost 7 lira to build, so while there was definitely an advantage, it wasn't as overwhelming as I though (and in fact, I won that game).
The final three expansions are labeled "Tier Three" and are not meant to be added to the game together (ie, you only play with one of the three in addition to any other expansion modules you want to use).
Mafia - meh. For me, this was the least interesting of all the expansions of any tier. Each player gets a card that represents a gift (the cards are unique and numbered 1-9). The cards are attached to the Grande worker and when you place your Grande in the same place as another Grande worker, you and that other player swap cards. If you place your Grande where there is no other Grande, you can swap your card for a random new card. At the end of the game, the player with the best gift gets 2 points and the player with the worst gift loses a point. Sorry, this is just a bit random and not at all interesting. And for two-players (which is again, what I mostly play), its just silly.
Arboriculture - This module adds a new player board that lets players also grow tomatoes, olives and/or apples. The arbor cards can be drawn anytime you'd draw a vine card (including during setup). Arbor cards are planted in the same land plots as vines, though they don't count towards the field's value. When you harvest a field for grapes, you also harvest any arbor item as well. There is also a morale track and whenever you place your Grande worker, you move down on the track. if you hit the bottom of the track, you lose a point. If you push the moral track to the top, you gain a point. You move moral up by discarding any number of glass tokens (from anywhere you have them) and moving the track one space up for each discarded. So why is this module cool? Well, it was the first expansion ever made for Viticulture, which makes it a little cool just for that. But history aside, the extras allow players to make extra points selling tomato sauce and olive oil and if you are going to have a ton of grapes and an apple tree (or two), you can also have an easy way to create points for yourself by hitting the top of the moral track each year. Not game breaking, but a good set of new options for players (and really, ignoring the board completely is only a small 1 point penalty).
/pic2471721.jpg)
Formaggio - this module is on the flip side of the Arboriculture player board and like Arboriculture, is another way to score some points. For this expansion, players are going to make cheese which they can sell alongside their wines. You have to be smart about it, because a cheese that ages too much just goes bad and is lost. But not to worry, there are spaces that let you control the aging of the cheese and your ability to sell it with your wine. However, in order to get these abilities, you have to use your precious influence (the same stars you'd use on the mini map for area control). While less interesting in a two-player game, this module should open up the influence game a bit in when you play with 3+.
Lastly, there is an inclusion of Viticulture Automa, which is a solo variant. I am not overly excited about playing solo efficiency games, so I have not bothered to explore (nor do I really plan to), the solo portion of the expansion.
And there you have it. If that seems like a lot, it both is and it isn't. The rules for the game and the expansions are not overly complicated and while there might be a lot of options for a new player, after a play or two, your choices are generally easy enough to grasp. With all the paths to scoring points and the ability to change gears when things are quite working out, I have found Viticulture + Tuscany to be my favorite worker placement game and one that I'd play almost anytime at any player count.
Hey! Be sure to check us out at PunchBoard Media!

/pic1816262.jpg)
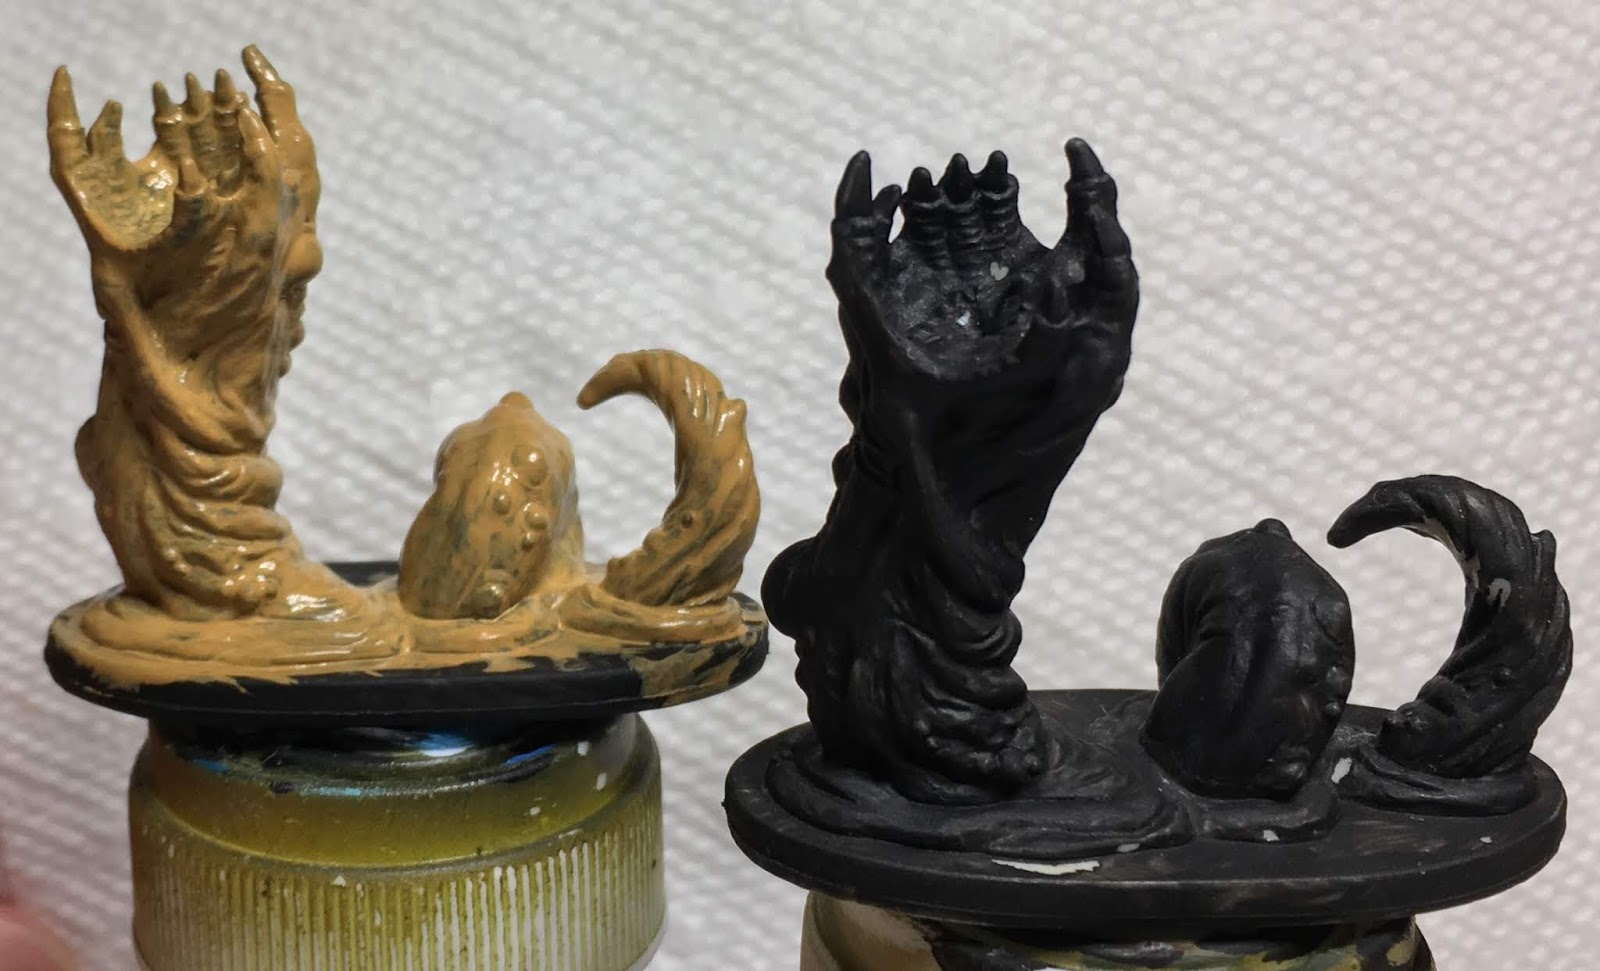
 I had already primed (in black gesso per my usual MO) the figures. For the normal worms, I wanted something of a bright orange "head" and a slightly less orange body. The green skin over the top would hide any glaring issues (I was pretty sure). I know that orange on black primer either looks like crap or take lots of coats, so I opted to basecoat with a tan. I already had a tan that I had mixed for my airbrush, but since I was only doing two models, I just brushed it on. Not perfect, but it didn't need to be for this exercise. For the master, I base coated a standard greycolor.
 Next up, I coated the bodies in Bestigor Flesh and the heads with Fire Dragon Bright Orange. This looked ok, but I wanted to take it up just a notch, which meant giving them a nice wash. For this, I use Cassandora Yellow which is very orange - too orange as it turns out, I think the age of mine is showing and it needs to be thinned down. Turned out ok though - nice bright orange like I was looking for, though it retaught me a lesson I had forgotten. When using similar hues next to each other and then a strong wash, you are going to have trouble noticing the differences.
 As you can see from the shot on the right, it just looks orange. Although it ended up being the color I wanted for the undertone, I needn't have wasted time using two shade. Oh well. For the master worm, I simply through on a black wash over the gray. I still hadn't a clue what I really wanted to do with the master except that I wanted the maw to be a pinkish color. I maybe should have just washed the grey primed worm with red, but I didn't. Oh well.
 Back to the regular worms. With a different brush in hand and a much better technique (ie the proper amount of paint on the brush). I managed to cover the worms in a nice green shade. Though it is hard to tell, I eventually went back with a lighter green to add some additional depth to the coloring in some areas (which I would once again waste with a wash).
 So now, the basics were done. What I needed was to start working the details. I spent a bunch of time looking at Warhammer models (because there are a lot of plague demons and other crap that have pustules on them). I pulled back out the Cassandora Yellow and put an appropriate size dot on each of the boils. Once that dried, I got out a bluish grey and painted in the boils. Things were looking good.
 For the master model... As I mentioned earlier, it ended up very red - actually almost purple. I dry brushed some gray, but inspired by this dragon model (if you are a painter, read this article, it is pretty interesting) and the artist's description of using purple and greens to create the different grays, I also dry brushed a light bit of green over the gray and finally felt like it was getting where I wanted it to be. The purplish undertone with gray-green looked pretty good (though I had really at this point lost the pink color I was trying for in the maw at the start).
 As I was finishing up the bases, I decided I wanted some of that pink back on the master, so I went and grabbed a bottle of pink and dry brushed the slightest amount around the maw.


/pic3013615.jpg)


/pic2628036.jpg)


/pic3122349.jpg)


/pic2286246.png)
/pic1886437.jpg)
/pic2937593.jpg)
/pic2381464.jpg)
/pic2473059.jpg)
/pic2474315.jpg)
/pic2471725.jpg)